پایپ پیت گیجPipe Pit Gage
وظیفه کلی گیج های جوشکاری عبارتند از:
* کنترل ابعادی قطعات و اتصالات مورد جوشکاری آماده شده
* کنترل سطوح شیب دار پخ خورده از نظر زاویه سطح شیب دار پخ خورده
* کنترل فواصل لازم بین قطعات جهت مونتاژکاری آنها
* کنترل هم سطح بودن یا نبودن قطعات قبل از مونتاژ و جوشکاری
* کنترل ابعاد جوش های تکمیل شده طبق نقشه بعد از جوشکاری
* کنترل و اندازه گیری عیوب احتمالی بر روی سطح جوش ها از نظر طول، عرض
و عمق آنها
پایپ پیت گیجPipe Pit Gage

پایپ پیت گیج |
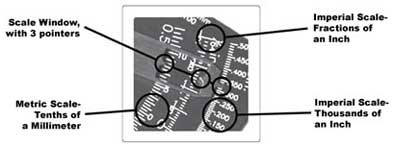
| The operator simply lines up the appropriate Pointer with the desired Scale. Specification or Jurisdiction normally governs the selection of the Scale to use. |
|
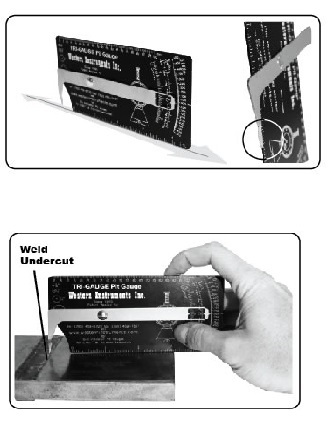
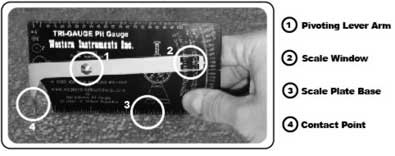
| Extend the Lever to the maximum depth, so the Scale is also reading a maximum measure. Place the Contact Point into the Pit (or area of corrosion), and gently bring the Scale Plate Base of the Tri-Gauge® firmly against the surface of the workpiece. The Scale Window will come to rest at the appropriate depth measurement. |
|
| Measuring Weld Reinforcement (Height) |
|
|
|
|
| Place the Lever to a neutral depth, so the Scale is also reading Zero. Place the Contact Point onto the top of the Weld Reinforcement, and gently bring the Scale Plate Base, of the Tri-Gauge®, firmly against the surface of the workpiece. The Scale Window will come to rest at the appropriate depth measurement. |
|
|
|
| Weld Undercut measurement is identical to Pit Depth Measurement by simply extending the Lever to the maximum depth, so the Scale is also reading a maximum measure. Place the Contact Point into the Undercut, and gently bring the Scale Plate Base of the Tri-Gauge® firmly against the surface of the workpiece. The Scale Window will come to rest at the appropriate depth measurement. |
|
| It is important for the Operator to know if the Tri-Gauge’s® Lever Arm and Contact Point are zeroed to the Scale. When the Contact Point is in contact with a flat surface, the Scale should read zero. However if there is an offset (positive or negative), the operator must be mindful to add or subtract the appropriate amount of error, thus keeping the measurement accurate. |
|
| When the Tri-Gauge® is manufactured a Skilled Technician Zeroed the Contact Point after the Offset Correction was induced into the Lever Arm. The Contact Point can become worn, damaged, or the Offset Correction® can be damaged. Any Zero Offset can become a hindrance to the operator, so it may be desirable to Zero the Contact Point.
This Standardization can be performed by Western Instruments or you can attempt it yourself. If you attempt it yourself, you will need a small Ball Peen Hammer, an Anvil (or heavy plate), a Flat Plate, and a fine 6″ file. You will need to determine if the Contact Point is too long or is too short. If the Contact Point is too short, it is placed on the Anvil, and the Hammer is used to Stretch the end by lightly taping the Contact Point. After each tap the Tri-Gauge® should be checked against the Flat Plate. If the Contact Point is too long, or you have stretched it too much, the Tip is lightly filed from the beveled or inner side (adjacent to the Scale Plate).پایپ پیت گیج |


